If you're forced to use Windows at work instead of Mac OS or Linux and you're also a VIM user you're in for some fun. I struggled for a while with the best way to get VIM up and running on Windows. Sure you can simply install VIM from http://www.vim.org but then how do you set up your vimrc and pathogen and use git repos to setup things for you? I recently had to setup a new Windows 7 machine and this is what worked for me.
First go to http://www.vim.org and install VIM. It put itself in C:/Program Files (x86) on my machine which is fine. Upon launching it you get the basic VIM install which is black on white. Typing "echo $HOME" shows that VIM on Windows 7 has a home directory of C:\Users\<username>. If you type "echo $MYVIMRC" it will still be the default installation of C:\Program Files (x86)\Vim\_vimrc. Notice that it is NOT .vimrc but rather _vimrc which is the major difference running on Windows.
I like to start my VIM installation with a bunch of dot files from Hashrocket called dotmatrix. Using Git on Windows is a bit beyond this post but start with a client like SourceTree or Github's client. Copy all the files directly into your C:\Users\<username> directory. Now to convert this installation to Windows simply rename the .vimrc file to _vimrc and the .vim directory to vimfiles.
The next thing I do is install the jellybeans.vim color scheme. To do this copy all the files to the root of the vimfiles folder in your user directory. Then create your own .vimrc.local file to add the jellybeans theme to your VIM installation. Mine looks like this:
I first override the Comment style to not be italicized because it makes it extremely hard to see where things line up. Then I instantiate the jellybeans color style.
At this point you're pretty much ready to go. Add any additional VIM customizations to the .vimrc.local file so if you ever update the Hashrocket files you won't lose your changes. Happy VIMing!
Tuesday, May 7, 2013
Tuesday, November 13, 2012
Configure a GoDaddy domain with Heroku
Since this is the second time I've done this in a month I thought I'd write a post about it. I recently created a Rails site on Heroku where people can search for online professional development courses called reviewpd.com. After much deliberation with my partner we decided to rename the site to onlinepdreviews.com. This is how I switched the domain.
First I simply bought another domain from GoDaddy. They might not be the cheapest but I find them pretty easy to work with.
Then you configure your Heroku application to add the new domain:

First I simply bought another domain from GoDaddy. They might not be the cheapest but I find them pretty easy to work with.
Then you configure your Heroku application to add the new domain:
$ heroku domains:add www.onlinepdreviews.com
Adding www.onlinepdreviews.com to onlinepdreviews... done
Then you configure your GoDaddy domain to point to your Heroku app. Open your GoDaddy account and Launch the domain you want to edit.

Click Launch under DNS Manager. Under the CNAME section you'll already see a 'www' entry. Edit this and change it to onlinepdreviews.herokuapp.com.

Heroku has more information.

Click Launch under DNS Manager. Under the CNAME section you'll already see a 'www' entry. Edit this and change it to onlinepdreviews.herokuapp.com.
Heroku has more information.
You'll also want to configure the naked domain (http://onlinepdreviews.com) to point to your CNAME domain (www.onlinepdreviews.com). To do this go back to the Domain Details page of the domain you are editing. (Sometimes it helps to sort of start over in GoDaddy by clicking My Account in the top right, then Domains, then Launch next to the domain you want). On the left side under Domain Information click Manage next to Forwarding.
Simply type in the CNAME subdomain such as http://www.onlinepdreviews.com. If you refresh the page you'll see Forwarding is now On and should list your subdomain.
Saturday, October 8, 2011
Chrome Browser Extension
I recently wrote about building a Firefox extension for our website, Narf.com. The process involved many XML files including learning XUL to display the simple menu in our extension. Chrome on the other hand, is an extremely lightweight extension which begins with the following manifest file:
The permissions and browser_action items are the only ones worth describing. Google describes permissions better than I can but the basic idea is that you need to tell Chrome what your extension is allowed to do. I specify that I need acccess to 'tabs' because I use the chrome.tabs and chrome.windows module. I also request access to narf.com.
Browser Actions are used to add an icon to the Google toolbar after the address field. This adds an icon in the same way as the Chrome wrench icon.
The browser action defines popup.html which is the page that is displayed when the icon is clicked. This page is simply a HTML page that you can use all your knowledge of HTML on. I found this approach much easier to wrap my head around than Firefox's reliance on XUL. Here is a portion of our popup.html:
As you can see the html itself is some extremely simply divs which call out onClick handlers which I define in the script above. I removed the more complex examples that are specific to our site, but left two simple ones that demonstrate how the Javascript is used to interact with the Chrome browser.
The first, refreshNarfTabs, is used to refresh all tabs which are currently displaying a narf.com address. This is achieved by first getting the current window, which is the browser window where the action was invoked. This then calls an anonymous function where we get all the tabs in the current window. Then for each tab we check to see if 'narf' is in the url and refresh it. You'll notice a lot of the Chrome APIs rely on callbacks because much of it is asynchronous.
The other function I include for reference is showNarf which opens a new tab with the Narf.com homepage. It is pretty simple which is exactly how it's supposed to be. The window.close() at the top is just to close the popup window that displays the menu.
The nice thing about Chrome extensions is that it's just HTML. You don't have to learn a new GUI system or language to build something pretty powerful.
Sunday, September 18, 2011
Firefox Browser Extension
Our team has recently built browser extensions for Firefox, Chrome and Safari for narf.com. I was the author for the Chrome and Safari extensions but I'll try to talk intelligently about Firefox as well.
Building a Firefox extension requires quite a few files and directories. Firefox has an example listing from on their developer site. Here is a directory listing from our plug-in:
Firefox also makes fairly heavy use of XML configuration files such as the install.rdf file and the XUL GUI files. An interesting exception is the manifest file which is a space delimited file used to register your content with Chrome. Chrome in this case is what Firefox calls the user elements outside the traditional website window which includes toolbars and menu bars. Our looks like this:
Firefox forces you to create your "Chrome" with XUL definitions. XUL is a XML language that allows you to describe your GUI. We ended up creating something like this:
This file is also where you add the link to the Javascript code (narfHelper.js in our case) which will handle all the GUI interactions. You'll notice that we're creating a simple popup menu here which calls functions defined in our Javascript. That is where all the magic occurs.
In the Javascript you have to do things the Firefox way. One such example is displaying popups to the user:
var prompts = Cc["@mozilla.org/embedcomp/prompt-service;1"].getService(Ci.nsIPromptService);
prompts.alert(window, "Narf.com", "Please login and try again");
In the Javascript you have to do things the Firefox way. One such example is displaying popups to the user:
var prompts = Cc["@mozilla.org/embedcomp/prompt-service;1"].getService(Ci.nsIPromptService);
prompts.alert(window, "Narf.com", "Please login and try again");
I actually have no idea where my partner got this code but it looks anything but obvious to me.
Firefox also has support for localizations and various 'skins' which you can achieve through the use of CSS files. It is a powerful system but has a fairly steep learning curve with a lot of additional steps. Thus I think it's the hardest browser of them all to develop extensions for which is ironic considering it probably has the most. However, it was also the first to offer this capability and perhaps the other browsers have learned easier ways to accomplish the same thing. We'll discuss more in a future post about Chrome and Safari.
Thursday, August 11, 2011
Ruby, QT, & Windows .. Oh my!
I'm building Ruby application GUIs on Windows using QT and recently ran into an interesting bug. My coworker Ryan Melton created the qtbindings gem because of existing problems getting Ruby and QT to play nice on Windows. This had worked well under Ruby 1.8.6, 1.8.7, and even 1.9.1 (but who uses 1.9.1?). However when we transitioned to Ruby 1.9.2 we got some consistent (and some random) crashes when running our applications. He debugged this issue and fixed in in the latest version of the qtbindings gem and was nice enough to explain his process so I could write about it.
Identify the problem
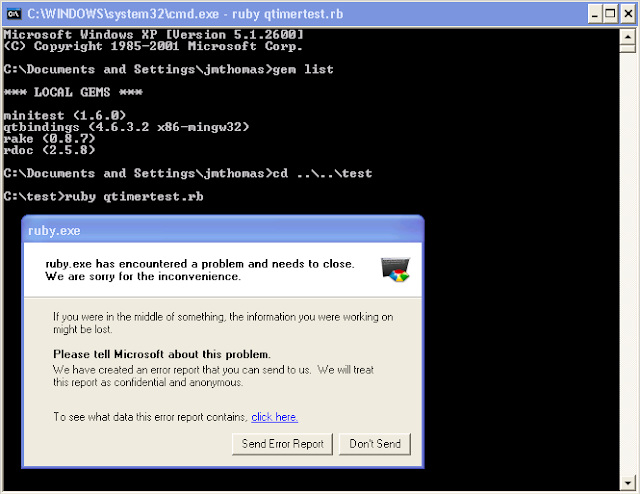
The first step was to identify the smallest application we could that would consistently crash Ruby 1.9.2. Ryan created the following script which fit the bill nicely.
Fully understanding this script requires knowledge of QT but you may notice we're creating a bunch of Timers here which are spawning threads. You also might be aware of how drastically different the Ruby 1.9 threads are from Ruby 1.8 so we might be on to something here. Running this script resulted in the following Windows crash: (notice the qtbindings 4.6.3.2 gem)
When I identified Ruby 1.9.2 was causing these crashes I installed every released patch level of Ruby 1.9.2 from rubyinstaller.org hoping that one would work. I even tried installing Ruby trunk but they all caused the same crash behavior.
Building Ruby from Source
The Ruby installed by rubyinstaller is optimized which makes it difficult to use in deep debugging sessions. Therefore you need to build Ruby from source which, thanks to the rubyinstaller DevKit, is pretty easy.
First clone the rubyinstaller github project onto your Windows machine. I used cygwin for this although you can also use MSYS and even get TortoiseGIT. I then followed the FAQ to build a gdb friendly build which disables optimization. This takes a long time but once it completes you can set your Windows path to this newly build Ruby.
Debug using gdb
 Once the program crashes I type 'bt' to display the stack backtrace. But the top stack frame is in ntdll.dll. Notice the final comment by gdb: "previous frame inner to this frame (corrupt stack?)". Since we're not anywhere in Ruby it looks like we crashed so badly we confused gdb such that it couldn't give us a useful stack.
Windows Debugger
At this point Ryan had the Windows debugger installed and was able to run Ruby from that to get a more meaningful stack. I'll leave that as an exercise for the reader. What he found was that in the QT code the following Ruby function was being called: rb_exc_raise(). Since Ruby doesn't return from this call we need to break on it and see what is happening.
Breakpoints in gdb
Running gdb again I set a breakpoint by typing 'break rb_exc_raise'. Notice gdb complains that the function is not defined. This is because on Windows 'ruby' itself is basically a wrapper application that calls the Ruby dll which contains all the Ruby awesomeness.

Now we run the qtimertest.rb file again:
This time we break right away. Compare the number of Threads spawned with the gdb trace from above. If you view the backtrace here you'll notice it does not have anything to do with our bug. So we continue with 'c' and continue again before we spawn all our threads.
Now we break again and view the backtrace:

Ahh, now we have a decent stack trace to look at. The last thing in the stack is a call to stack_check in vm_eval.c:201. So why would a call to stack_check fail within Ruby? If you look at the full trace you'll see that we initially started in the Windows DLL and the proceeded up the stack into Ruby where we called the stack_check method. This causes a crash because you can't call ruby methods from outside of Ruby threads, especially ones checking the thread stack size!
So how did this happen? Well, basically rb_call0 got rewritten from Ruby 1.9.1 to Ruby 1.9.2 and while the call to stack_check was always there, it didn't get called in Ruby < 1.9.2 (at least in our example) but does in the rewritten code causing the crash. Thus the bug was always there but due to the refactoring in Ruby 1.9.2 it presented itself.
Fix the Problem
So what is the solution. We can't change the Ruby code so if we traverse down the stack we find the last call in our QT bindings is QtRuby::Binding::callMethod. So this is where we need to make our fix. Here is the fix Ryan implemented:
Notice the new call to ruby_stack_check. ruby_stack_check in turn calls stack_check. But I thought the call to stack_check was the problem in the first place?! It was but that was a different stack_check! vm_eval.c defines an inline stack_check which calls rb_exc_raise if it returns non zero. gc.c also defines a stack_check which simply returns 0 if the stack is ok or 1 if it has overflowed. So when we call it in our if statement (via ruby_stack_check), it returns 1 and we simply return false rather than trying to do the VirtualMethodCall. Tricky bug with an extremely simple solution.
Hopefully this helps if you have to do the occasional debugging on everyone's favorite platform: Windows.
This blog was inspired by The Passionate Programmer.
Identify the problem
The first step was to identify the smallest application we could that would consistently crash Ruby 1.9.2. Ryan created the following script which fit the bill nicely.
Fully understanding this script requires knowledge of QT but you may notice we're creating a bunch of Timers here which are spawning threads. You also might be aware of how drastically different the Ruby 1.9 threads are from Ruby 1.8 so we might be on to something here. Running this script resulted in the following Windows crash: (notice the qtbindings 4.6.3.2 gem)

When I identified Ruby 1.9.2 was causing these crashes I installed every released patch level of Ruby 1.9.2 from rubyinstaller.org hoping that one would work. I even tried installing Ruby trunk but they all caused the same crash behavior.
Building Ruby from Source
The Ruby installed by rubyinstaller is optimized which makes it difficult to use in deep debugging sessions. Therefore you need to build Ruby from source which, thanks to the rubyinstaller DevKit, is pretty easy.
First clone the rubyinstaller github project onto your Windows machine. I used cygwin for this although you can also use MSYS and even get TortoiseGIT. I then followed the FAQ to build a gdb friendly build which disables optimization. This takes a long time but once it completes you can set your Windows path to this newly build Ruby.
Debug using gdb
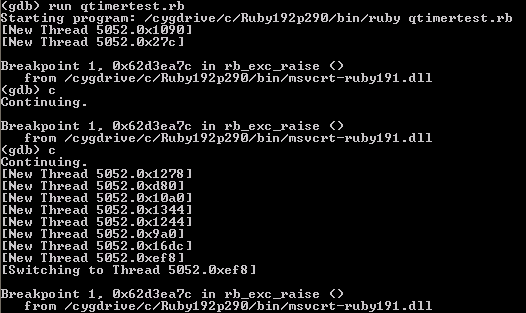
Now that we've build from source gdb is our friend. I used the cygwin version of gdb (make sure to request it in the setup installer) by simply typing it's path followed by ruby (you can also get gdb from MSYS). When gdb is running you run your ruby application with 'run qtimertest.rb' as shown:

Windows Debugger
At this point Ryan had the Windows debugger installed and was able to run Ruby from that to get a more meaningful stack. I'll leave that as an exercise for the reader. What he found was that in the QT code the following Ruby function was being called: rb_exc_raise(). Since Ruby doesn't return from this call we need to break on it and see what is happening.
Breakpoints in gdb
Running gdb again I set a breakpoint by typing 'break rb_exc_raise'. Notice gdb complains that the function is not defined. This is because on Windows 'ruby' itself is basically a wrapper application that calls the Ruby dll which contains all the Ruby awesomeness.
Now we run the qtimertest.rb file again:
This time we break right away. Compare the number of Threads spawned with the gdb trace from above. If you view the backtrace here you'll notice it does not have anything to do with our bug. So we continue with 'c' and continue again before we spawn all our threads.
Now we break again and view the backtrace:

Ahh, now we have a decent stack trace to look at. The last thing in the stack is a call to stack_check in vm_eval.c:201. So why would a call to stack_check fail within Ruby? If you look at the full trace you'll see that we initially started in the Windows DLL and the proceeded up the stack into Ruby where we called the stack_check method. This causes a crash because you can't call ruby methods from outside of Ruby threads, especially ones checking the thread stack size!
So how did this happen? Well, basically rb_call0 got rewritten from Ruby 1.9.1 to Ruby 1.9.2 and while the call to stack_check was always there, it didn't get called in Ruby < 1.9.2 (at least in our example) but does in the rewritten code causing the crash. Thus the bug was always there but due to the refactoring in Ruby 1.9.2 it presented itself.
Fix the Problem
So what is the solution. We can't change the Ruby code so if we traverse down the stack we find the last call in our QT bindings is QtRuby::Binding::callMethod. So this is where we need to make our fix. Here is the fix Ryan implemented:
Notice the new call to ruby_stack_check. ruby_stack_check in turn calls stack_check. But I thought the call to stack_check was the problem in the first place?! It was but that was a different stack_check! vm_eval.c defines an inline stack_check which calls rb_exc_raise if it returns non zero. gc.c also defines a stack_check which simply returns 0 if the stack is ok or 1 if it has overflowed. So when we call it in our if statement (via ruby_stack_check), it returns 1 and we simply return false rather than trying to do the VirtualMethodCall. Tricky bug with an extremely simple solution.
Hopefully this helps if you have to do the occasional debugging on everyone's favorite platform: Windows.
This blog was inspired by The Passionate Programmer.
Subscribe to:
Comments (Atom)